Friday, 21 August 2020

Its a Jungle Out There!!!

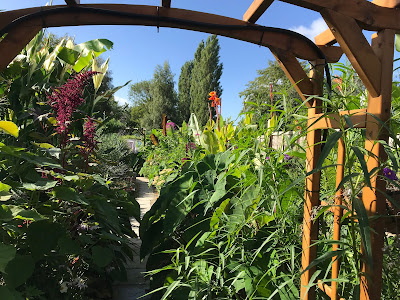
 I have no idea what has gone on in the garden this year? Its like the plants are on steroids! I don't think that in all the years I have grown 'exotic' looking plants I have had a year like this.

You can hardly get down the path. Its fun.

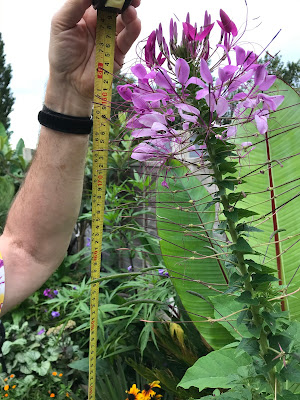
We decided that because of the phenomenal growth we should measure a few of the plants to use as comparison in future years or to just see if this is a one off. So apologies for hubbies shirt in the following pics lol!!


Amaranthus, should be about 4ft as you can see it is bigger than hubby who is 5ft 10in.


The beautiful Cleome, such a stunning flower with evil thorns on its stem, another 4 footer as you can see hitting 6ft!


Amaranthus pointy finger  apparently should be just over 3 ft, but this is closer to 5ft.

Good old Colocasia Pink China


Similar view from last year and I think you get the idea in the difference.

I was trying to think what I have done differently, I added bags of manure, the plants get chicken pellets when planted then I throw some more on about halfway through the growing season. The big change is the watering system. I am pleased-ish with this new system, I do need to make some alterations as to the placing of the spray heads, but on the whole its doing its job.

In the last few days through the heavy rain storms and high winds I have had to stake and tie up lots of  the plants.


Canna Stuttgard exceptional tall habit up to 3 metres which it has easily hit this year. This clump is now huge and will have to be split this autumn as it is currently charging off around this bed and taking over.


The Canna (above)with the orange flower is actually Canna Cleopatra, according to the RHS 'Cleopatra is a vigorous, clump-forming perennial to 5 ft tall'. As you can see it is a lot taller than that.
It is one of my favourites as both the foliage and the flower are stripy. In all honesty it is not in the best place to show it off. I was waiting for it to clump up a bit before I moved it.

Canna Pretoria, on the right, another 4-6 ft one.


The path is slowly disappearing.


Down by the pond, the Ricinus Zanzibarensis on the right is huge. Such beautiful leaves.


Such beautiful plants, all grown from seed, I love the different colours.

Just look at this Ricinus communis 'New Zealand Black' the purple hues in this are stunning.

My garden brings me great joy and peace, it has been a tough month for us/me. My Godfather a very special and important man in our family passed away the end of July. I am grateful he is at peace and out of pain, but he has left a huge hole in my heart.

This is exactly how I want to remember him, such a happy, cheerful man. He has been in my life, all of my life and will be greatly missed.

Wednesday, 5 August 2020

Thrilled with my Garden

I have not blogged for awhile as I have been having a couple of problems, I have tendinitis, which is so painful, I can't get a shoe on and I hobble around like an old woman!!!  Which is making life rather difficult.
The garden is blooming, some parts are fabulous and other parts need a bit more work.
This is the part of the garden I usually love the best, I am not so happy this year, its ok but needs some changes.


This is the same bed but from a different angle. What I have noticed is that plants this year that should only be 20 inches high have grown to over a metre. I have no idea why but it probably why this bed is not my favourite this year.


The banana 'Musa Basjoo' my hardy banana that came through the winter standing it usually collapses back to the root, I thought it would romp away, but it hasn't. It has been very slow even though its been fed and watered regularly. The Canna is far bigger than the banana.


This is the bed opposite, which has gone bonkers. The Cannas are doing so well and the Pink China clumps (big leaves at the front) have also gone mental they are close to 4ft tall which is huge for me, I am going to have to split them at the end of this year.


Same bed but from a different angle.


Now we come to my favourite part, I extended the jungle further down the garden and I really love how this is looking at the moment. On the way down I definitely have a few gaps but I have stuck canes in to mark where I need to move some of the taller Cannas when I split them.


The next pic, same bed but different angle.


These Cleomes are the same height as me? I know I did not buy this height as my garden is not really big enough, but they look so healthy.


These Cannas tower over me now, this one is aiming to take over this bed so some serious digging will be done in the autumn to split this and move round the garden.


On the other side another Canna going for the sky hasn't spread so far, yet.


Everyone is loving the changes I have made, so all the work I put in during 'lockdown' is paying off. It has been suggested I extend the 'jungle' look in the lower part of the garden especially since I redid the bed down by the pond.
This is how it looks down there, its a difficult part of the garden and I spend my life fighting back my neighbours Euphorbia and a huge grass that wants to grow in my garden not hers. So this autumn I will seriously consider digging most of this bed out, possibly using bamboo rhizome barrier along the fence line to stop invasions of unwanted  plants.


Then hopefully it will match this


Till next time x

Sunday, 5 July 2020

Colour on Dull Days

I show a lot of my large leaved plants on my blog and I think my garden can appear to be very green, Over the years I have gradually introduced more colour.
I chuckle to myself when I think back to helping mum and dad in their garden. Dad being a seafarer really enjoyed working in the garden, he had a veg patch and grew lots of dahlias. In those days I hated dahlias they always seemed to be full of earwigs, so here we are at least 50 years further on and what am I growing.....

Lots of dahlias lol!

This group of dahlias is from Thompson and Morgan 'Harlequin Mix' they come as tiny plug plants which you bring on and then plant out.


I love the different colours and shapes,


not an earwig in sight..


some just simple and plain


others pretty and blowsy


 including pastel colours too


I have more in the rest of the garden that have not yet flowered, so I can show you those another time.


These have all been planted in the large trough down by the pond. I know it still seems pretty green, to be honest my camera doesn't do it justice, plus there are still loads of buds to bloom.


What it does do is disguise the fence and makes the seating area very 'cosy'.


I think the best is still to come.

At the very bottom of the garden I have a large trellis which I have sent a couple of clematis up. This helps hide the greenhouse.
These clematis have gone mad this year, absolutely smothering the trellis with masses of flowers.


I keep having to cut it back as it stretches to take over anything in its reach, whilst also trying to stop my neighbours Clematis Montana, planted on a small trellis from trespassing and taking over my trellis and my garden!


She 'my neighbour' also has a very vigorous Euphorbia which I am forever having to dig out of my beds as it tries to invade. Ironically it can hardly be seen her side, preferring mine!!! Not that I don't like Euphorbia just not in the beds it invades!!

Now Begonias!!! My mums favourite. I have never really liked them, its the flowers I don't like, but since I have planted them, they have flowered and flowered and flowered. So I now get why they are so popular, doesn't mean I like them.


The hanging basket is amazing, Begonia Apricot Shades  also from Thompson and Morgan. Stunning colours, simple to look after, I water daily, feed once a week and don't even really dead head. The window box is behind, as I ordered extra plants which failed to turn up due to unprecedented demand.


So would I order them again, unfortunately yes. You may laugh even though I don't like the flowers their colour right from day one has been amazing. 
There is an elderly lady in the village who has huge begonia displays year in, year out, they always look so good, no matter what the weather does.

Hubby went to buy a fish the other day and came back from the garden centre with this..


A hardy Hibiscus, the colour is stunning and it looks gorgeous on our patio. Now whether it is hardy or not in my garden we will see!

Now the tomatoes, in the Vivigrow,  well what can I say , they are growing... lots


The roots have gone mad and I have to top it up very regularly as the guzzle water. I think my only worry is how close the all are.


I have missed a few of the side shoots, so I have a couple which are huge and have tomatoes on, I never know at this stage whether to take them off or not, so currently the are still on!


See you next time x

#thompson&morgan  #harleqindahlias  #begoniaapricotshades #greenhousesensation #vivigrow 

Sunday, 28 June 2020

Garden Irrigation plus more

I cannot believe it is nearly the end of the month and this is only my 2nd blog post for the month. What have I not been doing??
So at long last I have set up the irrigation system, well overdue. Being a totally south facing garden we and it bakes so I spend a long time watering and even in the late evening it can be very hot.
After much research, mainly due to financial restraints, as there is only so much money I could spend. I chose a micro jet spray system from Easy Garden Irrigation.
With the help of hubby, we drew up a plan of the garden, initially planning to only do one side of the garden, ordered the medium kit which came relatively quickly bearing in mind Covid19, then set it up.

I thought I had taken a pick of the box when it came but I can't find it anywhere? Basically it had the following in

Image taken from Easy Garden Irrigation. you get more than in the pic, but all the elements are there.

Professional pressure reducer 175 kPa
10 x 180 degree Vari-jet stkes with tube
2 x Vari-flow 90 degree micro jet heads
2 x 360 degree micro jet heads
1 x nut and tail adaptor
2 x T connectors
4 x elbow connectors
3 x stop ends
10 x supply pipe stakes
1 x 25 metre irrigation supply piep
10 x micro blanking plugs
5 x supply pipe nail in wall clips

I laid the pipe out, as instructed, in the sun, which we had plenty of, to warm up and make a bit easier to fit. Initially I was going to set it up watering the bed from back of the bed to the front, but it actually turned out easier to set it up front to back.

The first thing is the pressure reducer. We actually have excellent water pressure so I knew we needed this.


I then lay out the pipe all down the right hand side of the garden


you then work out where to put the vari-jet spikes, after reading up its roughly every 2 metres but I put them slightly closer together to allow for an over lap and no gap at the back where the two spray arcs  would have not met. Use the gadget supplied to pierce the pipe push the vari-jet attachment in, pop it in the ground and with any luck it should work and it did.

I ran it for about 1 hour each evening and was thrilled as to how well it did,doing the whole of one side in just the hour was amazing, so decided I needed to set up the other side of the garden as well.

Now this needed something more than just the irrigation system as I had to get it across the path and a pipe lieing across the path does not work for me, especially when my husband is so clumsy and would either walk on it or trip over it.

So after a visit to a garden centre once they were open of course, I set up an arch.


I'm rather pleased with it, I have planted a Kiwi Fruit, mainly because it has such pretty leaves, to grow up it.


It will be relatively easy to set up trellis to the right if it needs further to grow, then it can trot off down the fence.

So now I have the frame to guide the pipe over. This time I didn't go for a kit I just ordered the extra bits I needed as I still had some left over from the first kit. So using a 't' junction piece I cut the pipe, and sent it off over the arch.


its currently tied with string because I cannot find the cable ties anywhere??


it now waters both sides of the garden.


You can just about make out the spray


I have ordered a timer so it will come on automatically.


What used to take me hours each evening and probably used lots and lots of water is all done in 1 hour and I don't even have to be there!


I think my only concern is, once all the plants have grown is the water going to reach the back of the beds? Well we will have to wait and see.
Of course since I fitted it we have had lots of rain!!! I think its called 'sods law'!

I have also been doing my 5 yearly paint of the front door, which did not turn out as well as I had planned.
I had wondered as it was starting to show signs of wear and tear, but once I started stripping, it turned out to be a far worse than expected.


Even with wood hardener it was still soft.


To be honest it doesn't owe us a penny. We can't remember exactly when it went in but we do remember who fitted it for us and we think it was at the same time as when we had the new wooden windows fitted so we are talking 20-25 years ago.
So I have done a bit of a bodge job, whilst we buy a new door .


It looks ok but it will not get us through another winter. The challenge now is to match the yellow.  I can do the painting, but I'm not getting any younger (sadly) and I found it really hard this time, its not light to lift so we have decided to go with a 'composite' door. I said to hubby we could go navy, but to be honest I love my yellow door, its bright, cheerful and welcoming. Fortunately he agrees, so the search begins. I will keep you posted.

More next time x